Solar Venturer Prototype
This blog is to try to document the progress, decisions, photos, ideas, musings, tasks and associated files in the endeavor to build, test and launch a craft that can motor, unaided, from Sydney to New Zealand
The blog entries are organised from the latest at the top to earliest at the bottom
The blog entries are organised from the latest at the top to earliest at the bottom
20th January 2019
I took the boat to Narrabeen Lagoon to test out all components and functions. The radio network that worked fine the day before refused to work on the day.
The first test was aborted due to seaweed fouling both propellers. Once this was cleared, the boat was started and sent off. It reached the first waypoint and turned for the second. It then developed a problem, possibly with one of the motors, that prevented it from turning left.
this caused it to run in circles, attempting to reach the waypoint. A chase boat on standby in case of problems turned off the motors and returned the boat to shore
This completes the prototype blog. Since I have already successfully tested each of the components and functions individually, I would rather spend my time and effort on the real thing, rather that waste them on a prototype
10th January 2019
Testing in the pool was successful for all processes.
Arranging to test out the boat on Narrabeen Logoon
11th December 2018
There have been a series of problems. Most have been physical, eg broken wires, rusty switches etc. and program problems such as code changes to libraries that affected my code. Each of these problems have had to be diagnosed and fixed, leading to two months of effort with no actual progress
Testing in the pool was successful for compass and motor control.
A problem with the radio transmission meant the radio board on the boat was replaced.
This did not correct the problem.
Due to travel, the boat now goes back into the garage until early November
3rd September 2018
The ecompass seemed to be giving random results, so I pointed the boat to the four compass points (0,90,180,270) and recorded the ecompass results. After staring at the difference between the two, I realised the ecompass had been placed in the boat upside down and back to front!
The boat has completed the first tests in the pool. The motors actuated and changed power according to the direction the boat was pointed.
I have resolved a problem with the cayenne display, and the longitude and latitude now show 5 decimal digits.
Just waiting for the rain to stop so I can go out near the pool to complete the testing
25th September 2018
All the programming has been tested and the cpu board and the navigation board (gps, ecompass) have been installed and tested in the boat.
Waypoints have been stored in the navigation computer for the navigation test at Narrabeen Lakes
The boat is now ready for launch (in our pool) to test the motor control
5th August 2018

AAAAARRRRRRGH. After soldering in all the components into the boat, nothing worked reliably and I was spending all my time working through a mess of wires trying to fault find.
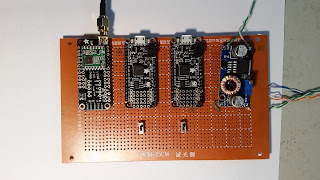
I made the decision to go back to my initial philosophy (KISS - keep it simple stupid) and took out the voltage and current monitoring board, and connected the remaining components onto Vero board so I could see exactly where each wire went. (see photos of main board)
I also took all the computer code for monitoring voltage, current and temperature out of the three programs, as well as removing the code to transmit this data through to Cayenne for display.
This has put me back a few weeks, but should enable me to have a more stable platform for the prototype testing


AAAAARRRRRRGH. After soldering in all the components into the boat, nothing worked reliably and I was spending all my time working through a mess of wires trying to fault find.
I made the decision to go back to my initial philosophy (KISS - keep it simple stupid) and took out the voltage and current monitoring board, and connected the remaining components onto Vero board so I could see exactly where each wire went. (see photos of main board)
I also took all the computer code for monitoring voltage, current and temperature out of the three programs, as well as removing the code to transmit this data through to Cayenne for display.
This has put me back a few weeks, but should enable me to have a more stable platform for the prototype testing
6th July 2018
All major programming components are now completed and tested OK.
All major programming components are now completed and tested OK.
25th June 2018
The GPS, E Compass and Motor control program is now working. This involved the use of an oscilloscope, as the signal to the motor ESC is a PWM wave
The GPS, E Compass and Motor control program is now working. This involved the use of an oscilloscope, as the signal to the motor ESC is a PWM wave
19th June 2018
A milestone! The solar panel, batteries and motor ESCs are connected up in the boat through the controller. This means I can move the boat outside and charge up the batteries, whilst I continue on the navigation and steering controllers.

A milestone! The solar panel, batteries and motor ESCs are connected up in the boat through the controller. This means I can move the boat outside and charge up the batteries, whilst I continue on the navigation and steering controllers.

25th May 2018
Creating the electronics boards to hold all the components. The first is the monitoring board for voltage and current (See below) I have connected the devices in series to test they work and send the correct data to the Pro Mini. Once complete, I will connect the solar panel, batteries and ESCs to the shunts

Creating the electronics boards to hold all the components. The first is the monitoring board for voltage and current (See below) I have connected the devices in series to test they work and send the correct data to the Pro Mini. Once complete, I will connect the solar panel, batteries and ESCs to the shunts

20th May 2018
After a very enjoyable trip to The Stans, I am back at work on the boat
The Radios work well and allow two way communication.
The Starboard hull is now wired up; connecting the battery, motor power and control and a temperature sensor attached to the ESC

After a very enjoyable trip to The Stans, I am back at work on the boat
The Radios work well and allow two way communication.
The Starboard hull is now wired up; connecting the battery, motor power and control and a temperature sensor attached to the ESC

29th March 2018
I have made wooden covers for the center section and glued in the rear covers.
After putting together a electrical conduit, the wiring between the hulls is now in place.
I tested out the Solar Panel and Controller by charging up the batteries. All worked fine.
 The Shore to Ship radio is built and ready to test with the Ship to Shore radio on the boat
I have made wooden covers for the center section and glued in the rear covers.
After putting together a electrical conduit, the wiring between the hulls is now in place.
I tested out the Solar Panel and Controller by charging up the batteries. All worked fine.

The Shore to Ship radio is built and ready to test with the Ship to Shore radio on the boat
23rd March 2018
After a few days days fabricating and welding the motor support pieces, the hull and internal structure is pretty much complete, with the motors attached and basic covers for the decks.

After a few days days fabricating and welding the motor support pieces, the hull and internal structure is pretty much complete, with the motors attached and basic covers for the decks.

15th March 2018
After a well earned holiday, I am back in Sydney for three weeks.
This break gave the gel coat time to fully cure
A coat of gel paint to the upper half of the hulls completes the painting of the hulls.
I then did a basic waterproof test of the hulls in the swimming pool. Success! the hulls are completely sealed against water.
Here is a photo of the painted hulls

15th February 2018
I have now tied the hull to the superstructure by fiber-glassing the steel tie and the wooden panels to the hull
Once this was complete, I applied the gel coat to the lower half of the hull, to make it waterproof
I have now tied the hull to the superstructure by fiber-glassing the steel tie and the wooden panels to the hull
Once this was complete, I applied the gel coat to the lower half of the hull, to make it waterproof
14th February 2018
Continuing with the tying of the superstructure to the fiberglass hull. It is a slow process, as I have to put a bead of filler between the hull and the panels to ensure the fiberglass adheres in the corners. This must dry for 48 hours before continuing.
Below is the schematic of the prototype, showing the components and connections at a high level

______________________________________________________________________________

Continuing with the tying of the superstructure to the fiberglass hull. It is a slow process, as I have to put a bead of filler between the hull and the panels to ensure the fiberglass adheres in the corners. This must dry for 48 hours before continuing.
Below is the schematic of the prototype, showing the components and connections at a high level
______________________________________________________________________________

7th February 2018
The superstructure is starting to come together. It consists of a central welded steel frame to support the Solar panel, with strengthening and rigidity provided by screwed and glued 9mm plywood timber panels and joints. Once this is complete, I can put it into the hulls and tie the whole together with steel tie (25mm*.3mm) covered with fiberglass and epoxy.

The superstructure is starting to come together. It consists of a central welded steel frame to support the Solar panel, with strengthening and rigidity provided by screwed and glued 9mm plywood timber panels and joints. Once this is complete, I can put it into the hulls and tie the whole together with steel tie (25mm*.3mm) covered with fiberglass and epoxy.

30th January 2018
Went to Brookvale to buy the angle iron and flat steel pieces to build the frame for the Solar Panel and to tie the boat infrastructure together
Went to Brookvale to buy the angle iron and flat steel pieces to build the frame for the Solar Panel and to tie the boat infrastructure together
27th January 2018
I completed the programming for the battery and motor voltage/current monitoring. This involved communicating with the voltage/current sensor module (INA-219) to get input voltage and associated current. This will be used in conjunction with the high current shunt. Now I have to setup the Solar Panel monitoring, which has a higher voltage (>26V) and needs a current shunt, in parallel with a AD623 amp to provide the required 0-5 voltage range for the Arduino Pro Mini to read
24th January 2018
I completed the programming for the navigation. This involved communicating with the GPS unit (NEO-8MN) and an electronic compass (ADAFRUIT BNO055) and wrote the code to get the GPS unit to calculate course and take the actual course from the compass to calculate course correction.
To test out the navigation components, I put into the program 3 waypoints located in a nearby park and added code to tell me to turn Left, Right or Straight Ahead. I then used the directions to navigate around the park.
It was very successful, with the GPS getting to with 5 meters of the waypoints. This is in the normal accuracy of GPS units.
19th January 2018
Thanks to some great assistance from Dongzhi in the coding of records and field conversion, the programs to communicate two way from ship to shore and onto the cayenne display have been completed.
Below is the Cayenne display and control panel. It not only allows me to not only monitor the important parameters from the ship, but also to override the navigation programs on the ship to control the motors directly from shore.
The values in the display are made up at the moment, as I don't have the sensors in place in the boat to generate these values.
The updated Cayenne display is below

Here are photos of the Adafruit Feather MO Express and Featherwing Radio boards. The radio uses a frequency of 455MHz. and with a suitable aerial should be more than strong enough to communicate ship to shore


8th January 2018
Started the superstructure for the prototype. This is the first day that The Shed is open after the Xmas break for me to do woodwork


24th December 2017
Completed the second hull. The mold is pretty much destroyed, but hopefully I won't need it again.

I have been looking at generating the course to the next waypoint.
The gps unit only provides a course if the boat is moving.
The course is the direction the boat traveled, not the direction the boat is pointing.
I have ordered some eCompass modules, and will have to store a list of locations and corresponding magnetic deviations to calculate true north and boat direction to be able to drive the motors to point the boat in the correct direction
14th December 2017
After another frustrating experience with Chinese clones of chips, the Adafruit CPU arrived and worked first time. I can now send messages by radio between two CPU boards. Once they are attached to proper antennas, the range should be over 1km
After another frustrating experience with Chinese clones of chips, the Adafruit CPU arrived and worked first time. I can now send messages by radio between two CPU boards. Once they are attached to proper antennas, the range should be over 1km
10th December 2017
Completed the first hull. I had to collapse the mold to get the hull off, but doesn't look too bad for a first effort. It should look even better after the Gelcoat is applied
 Working on the command and control system, specifically the radio TX/RX part

5th December 2017
Further frustration. The MO express board using CircuitPython seems very unreliable, failing constantly. I might try running Arduino instead and see if that is any more stable.
The lighter fiberglass cloth has arrived, so I will apply the second (and hopefully last) layer tomorrow
Further frustration. The MO express board using CircuitPython seems very unreliable, failing constantly. I might try running Arduino instead and see if that is any more stable.
The lighter fiberglass cloth has arrived, so I will apply the second (and hopefully last) layer tomorrow
30th November 2017
I completed the first layer of fiberglass. Not the best, but this is a leaning exercise.
A lighter weight of fiberglass (130gm/m versus 270gm/m) is arriving on Monday and this will be used for the second layer.
The Adafruit MO Express CPUs arrived and I have started to learn how to use them.
 The top board is the Mo Express Python base board. The lower board is the 455Mhz radio board
I completed the first layer of fiberglass. Not the best, but this is a leaning exercise.
A lighter weight of fiberglass (130gm/m versus 270gm/m) is arriving on Monday and this will be used for the second layer.
The Adafruit MO Express CPUs arrived and I have started to learn how to use them.

The top board is the Mo Express Python base board. The lower board is the 455Mhz radio board
29th November 2017
I started the laying the fiberglass, with the fiberglass cloth and applying Epoxy covering roughly a third of the hull form. I used the gram weighing machine to measure out the epoxy/hardener to 5:1 ratio


27th November 2017
After (another) day of frustration trying to code Chinese clones of Arduino boards, I have ordered 3 Adafruit MO Express micropython boards. These hopefully are more reliable and stable and will enable me to reduce the CPU count. So goodbye to Arduino and hello to Python, a language I have used before. These boards also communicate with the Adafruit 455Mhz boards I am using for communication between the boat and the land station
I am coding the three Adafruit MO Express computers (see details here) that will provide the functions of monitoring, control, communications, steering and heading and motor control
I painted the hull form in PVC Release Agent, over the contact paper and will let it dry tomorrow, before attempting the fiberglass mold.
After (another) day of frustration trying to code Chinese clones of Arduino boards, I have ordered 3 Adafruit MO Express micropython boards. These hopefully are more reliable and stable and will enable me to reduce the CPU count. So goodbye to Arduino and hello to Python, a language I have used before. These boards also communicate with the Adafruit 455Mhz boards I am using for communication between the boat and the land station
I am coding the three Adafruit MO Express computers (see details here) that will provide the functions of monitoring, control, communications, steering and heading and motor control
I am coding the three Adafruit MO Express computers (see details here) that will provide the functions of monitoring, control, communications, steering and heading and motor control
I painted the hull form in PVC Release Agent, over the contact paper and will let it dry tomorrow, before attempting the fiberglass mold.
Day 1 26th, November, 2017
The design document is a work in progress, and will not be complete until the boat is on its way
Current Status
1. The Boat -
I am building a prototype before attempting the real thing. This will hopefully allow me to make all the initial mistakes and learnings. I have constructed the form that I will coat in fiberglass to create the fiberglass hulls
2. The Controls
I have set up a page on cayenne.mydevices.com that will allow me to see the metrics for the solar panel, batteries and Electronic Speed Control (ESC) for the motors.
Along with GPS coordinates, heading and speed, this will allow me to monitor the health of the boat and by using the included motor sliders, I can control boat speed and if necessary, stop the boat.
The display is below


You must have the patience of some guy from the Bible to keep going after all that.Where do you intend to launch the final product?Good luck.
ReplyDelete